Why does it take a Professional Photographer so long to edit my images??
Sources at the bottom
I get asked this question a lot, believe it or not. When I tell a client that it will take 4-6 weeks to get their wedding images back, they always take a large gasp. When it’s a smaller portrait shoot like a family shoot it takes roughly 2-3 weeks, to get their images back I still get the same “shocked” affect on their faces. So I decided to break it down for everyone who is curious and really explain WHY it does take so long.
First Let’s start with the before image:
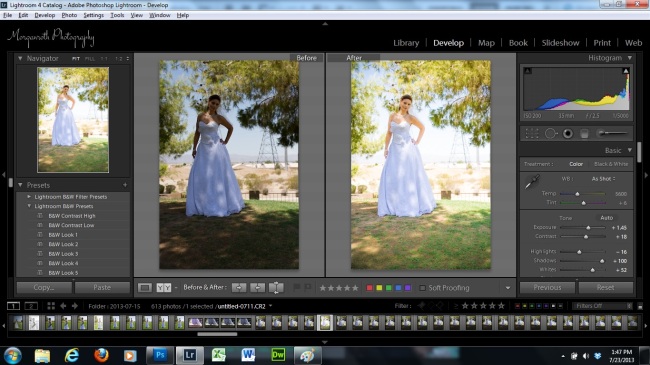
I shot this image with two things in mind. I knew we were in the shade, and I knew I wanted the background of the mountains to be slightly prominent and visualable. So I under exposed the Bride here in the shade. That’s because I also already knew what kind of post processing I wanted to use in order to give her this airy feel. So the Left image is straight out of the camera, and the right image is the over all “look” and “feel” I envisioned this image having. I made all of my minor adjustments here, like white balancing the dress, skin tone, blemish removal, and a few other minor color adjustments.
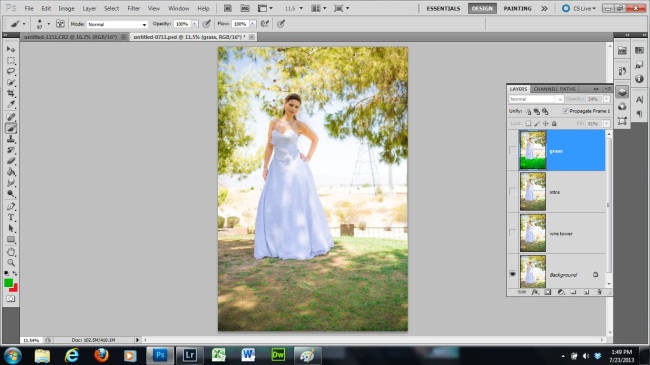
As you can see this is an example of an image that I would want to send to Photoshop to finish up. It’s got some eye sores and enhancements that I will need to fix, that Lightroom can not. First I never work on the original layer. Always make a second layer, which you can see I have four layers (5 if you include my watermark) over in the layers bar on the right. This is so I don’t have to scratch everything and start over, I can simply scratch layers if I don’t like them. Cuts down on processing time. Or if a client wants a small adjustment I can make that adjustment with no issues. Every change and every adjustment should have it’s own layer.
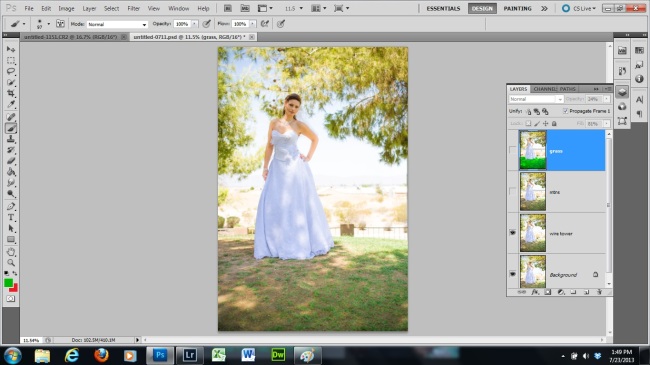
You can see in this layer, I removed the eye sore of the telephone and electrical lines in the background. It no longer distracts the eye and brings your focus back to the bride up front. However, the unkempt grass up front becomes an eye sore now, and we have lost some of the mountain we shoot for in the background from the original image.
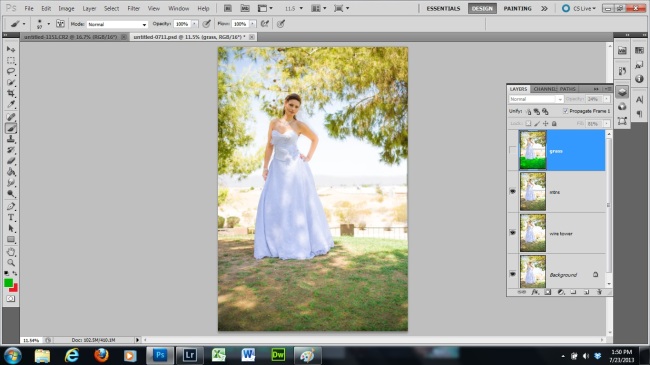
SO you can see in this image we brought the mountains in the background back up a little bit. To really give it this dynamic feel. It gives some depth in that negative space, and gives a feeling of presence.
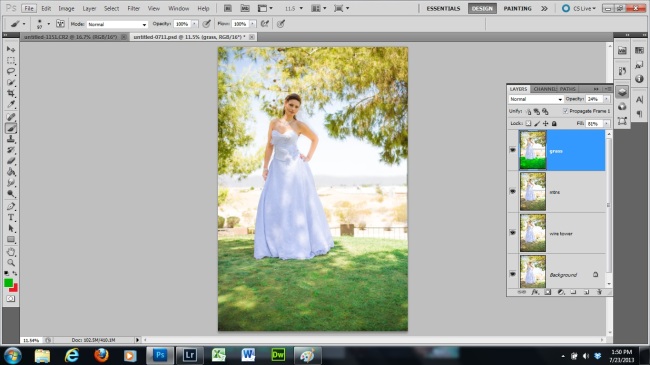
Now we fix the grass, in the foreground, to help the eye not fall on it like it’s an eye sore. Everything comes back and frames the most important part of this image, the bride in her dress. We used the color replacement tool in the image adjustments bar. What we did was add the plus color bar.
So you can see that the elements don’t always come together in the initial scene, or even in camera for a variety of reasons. The grass is not always this crisp cut greenery of beauty, there are sometimes eye sores in the foreground and or background. If you meter for one then you lose the info on the other, so this is where knowing what to meter for, and how you want the final image to look like, and knowing what is important and what is not. I did take this image with the bride metered correctly in case things were just not working out.
This is what our strive is. We don’t want eye sores in your images, we don’t want your images to be dull and or boring. This is why it takes us time, because for me to do just this one image, it took about 2.5 hours. Some are faster, and some are slower. This is why it takes so long.
It’s not because we are being lazy, or that we are forgetting, or just want to take your money and run. It’s because we are true artists, and we are making sure your image/s are absolutely 100% perfect and beautiful!
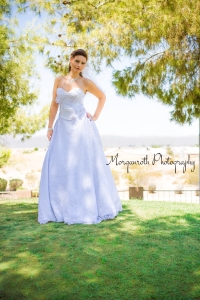
Final Image
More Reading:
http://momographyphotography.wordpress.com/2013/07/23/why-does-it-take-a-professional-photographer-so-long-to-edit-my-images/
http://www.ramilynphotography.net/why-does-the-editing-process-take-so-long/
First Let’s start with the before image:

I shot this image with two things in mind. I knew we were in the shade, and I knew I wanted the background of the mountains to be slightly prominent and visualable. So I under exposed the Bride here in the shade. That’s because I also already knew what kind of post processing I wanted to use in order to give her this airy feel. So the Left image is straight out of the camera, and the right image is the over all “look” and “feel” I envisioned this image having. I made all of my minor adjustments here, like white balancing the dress, skin tone, blemish removal, and a few other minor color adjustments.

As you can see this is an example of an image that I would want to send to Photoshop to finish up. It’s got some eye sores and enhancements that I will need to fix, that Lightroom can not. First I never work on the original layer. Always make a second layer, which you can see I have four layers (5 if you include my watermark) over in the layers bar on the right. This is so I don’t have to scratch everything and start over, I can simply scratch layers if I don’t like them. Cuts down on processing time. Or if a client wants a small adjustment I can make that adjustment with no issues. Every change and every adjustment should have it’s own layer.

You can see in this layer, I removed the eye sore of the telephone and electrical lines in the background. It no longer distracts the eye and brings your focus back to the bride up front. However, the unkempt grass up front becomes an eye sore now, and we have lost some of the mountain we shoot for in the background from the original image.

SO you can see in this image we brought the mountains in the background back up a little bit. To really give it this dynamic feel. It gives some depth in that negative space, and gives a feeling of presence.

Now we fix the grass, in the foreground, to help the eye not fall on it like it’s an eye sore. Everything comes back and frames the most important part of this image, the bride in her dress. We used the color replacement tool in the image adjustments bar. What we did was add the plus color bar.
So you can see that the elements don’t always come together in the initial scene, or even in camera for a variety of reasons. The grass is not always this crisp cut greenery of beauty, there are sometimes eye sores in the foreground and or background. If you meter for one then you lose the info on the other, so this is where knowing what to meter for, and how you want the final image to look like, and knowing what is important and what is not. I did take this image with the bride metered correctly in case things were just not working out.
This is what our strive is. We don’t want eye sores in your images, we don’t want your images to be dull and or boring. This is why it takes us time, because for me to do just this one image, it took about 2.5 hours. Some are faster, and some are slower. This is why it takes so long.
It’s not because we are being lazy, or that we are forgetting, or just want to take your money and run. It’s because we are true artists, and we are making sure your image/s are absolutely 100% perfect and beautiful!
Final Image

More Reading:
http://momographyphotography.wordpress.com/2013/07/23/why-does-it-take-a-professional-photographer-so-long-to-edit-my-images/
http://www.ramilynphotography.net/why-does-the-editing-process-take-so-long/


0 comments:
Post a Comment